
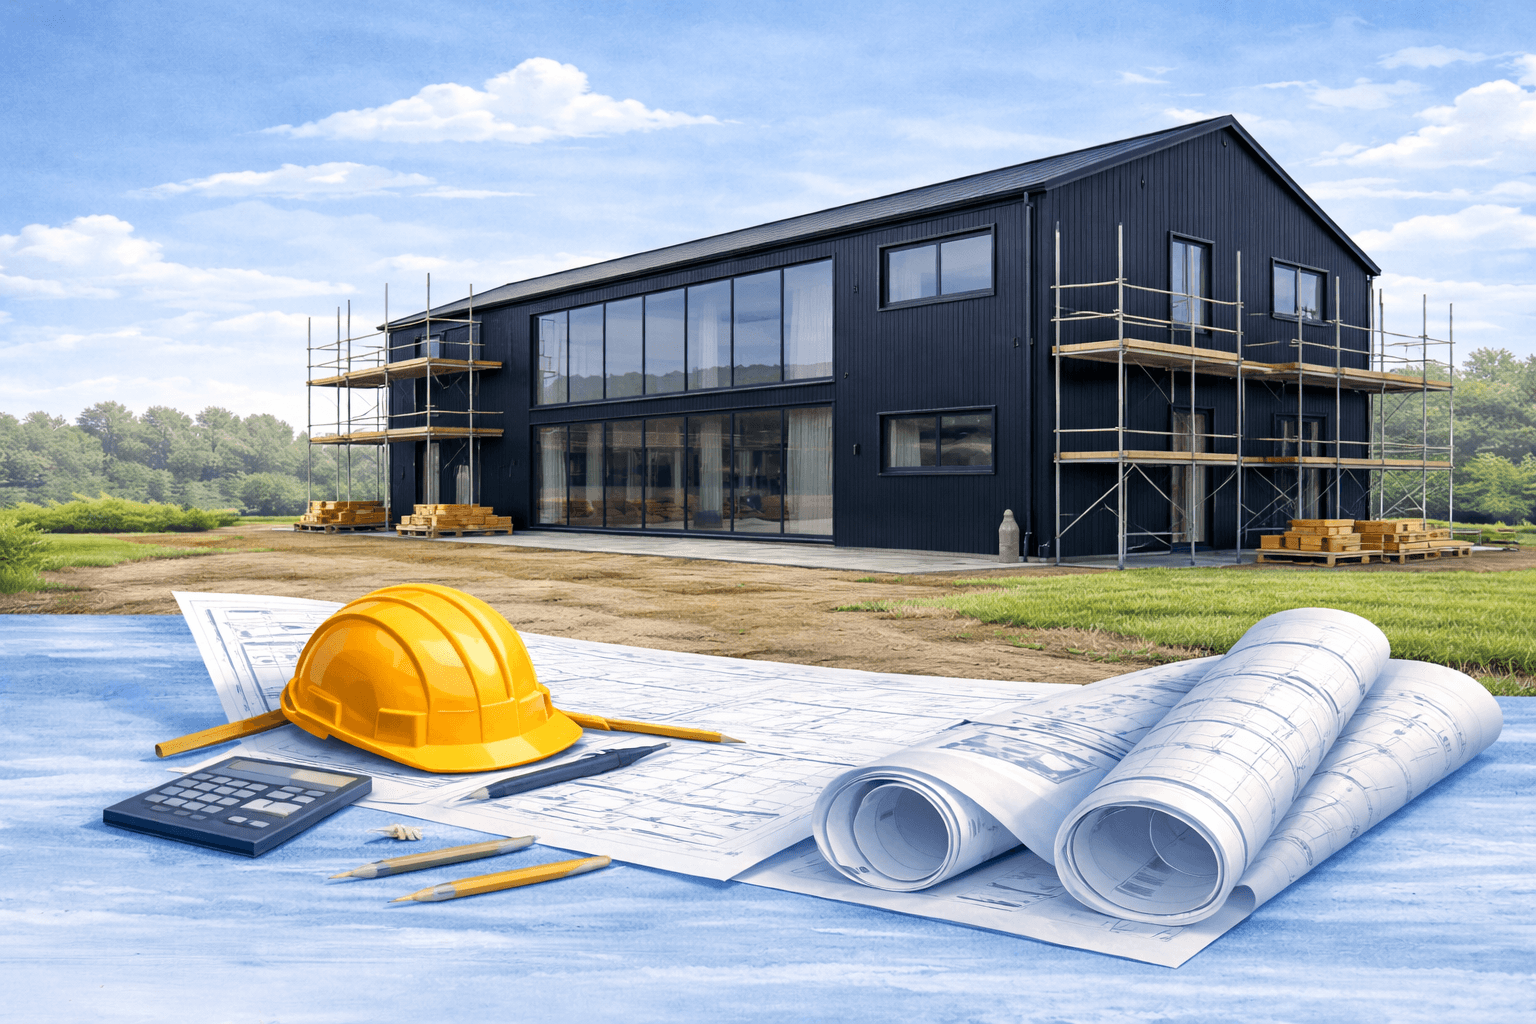
How a derelict agricultural barn became a 300m² contemporary home for £300,000 and why the experience eventually inspired BuildaPath.
Part One: The Project, the Goal, and the Odds
What Was There
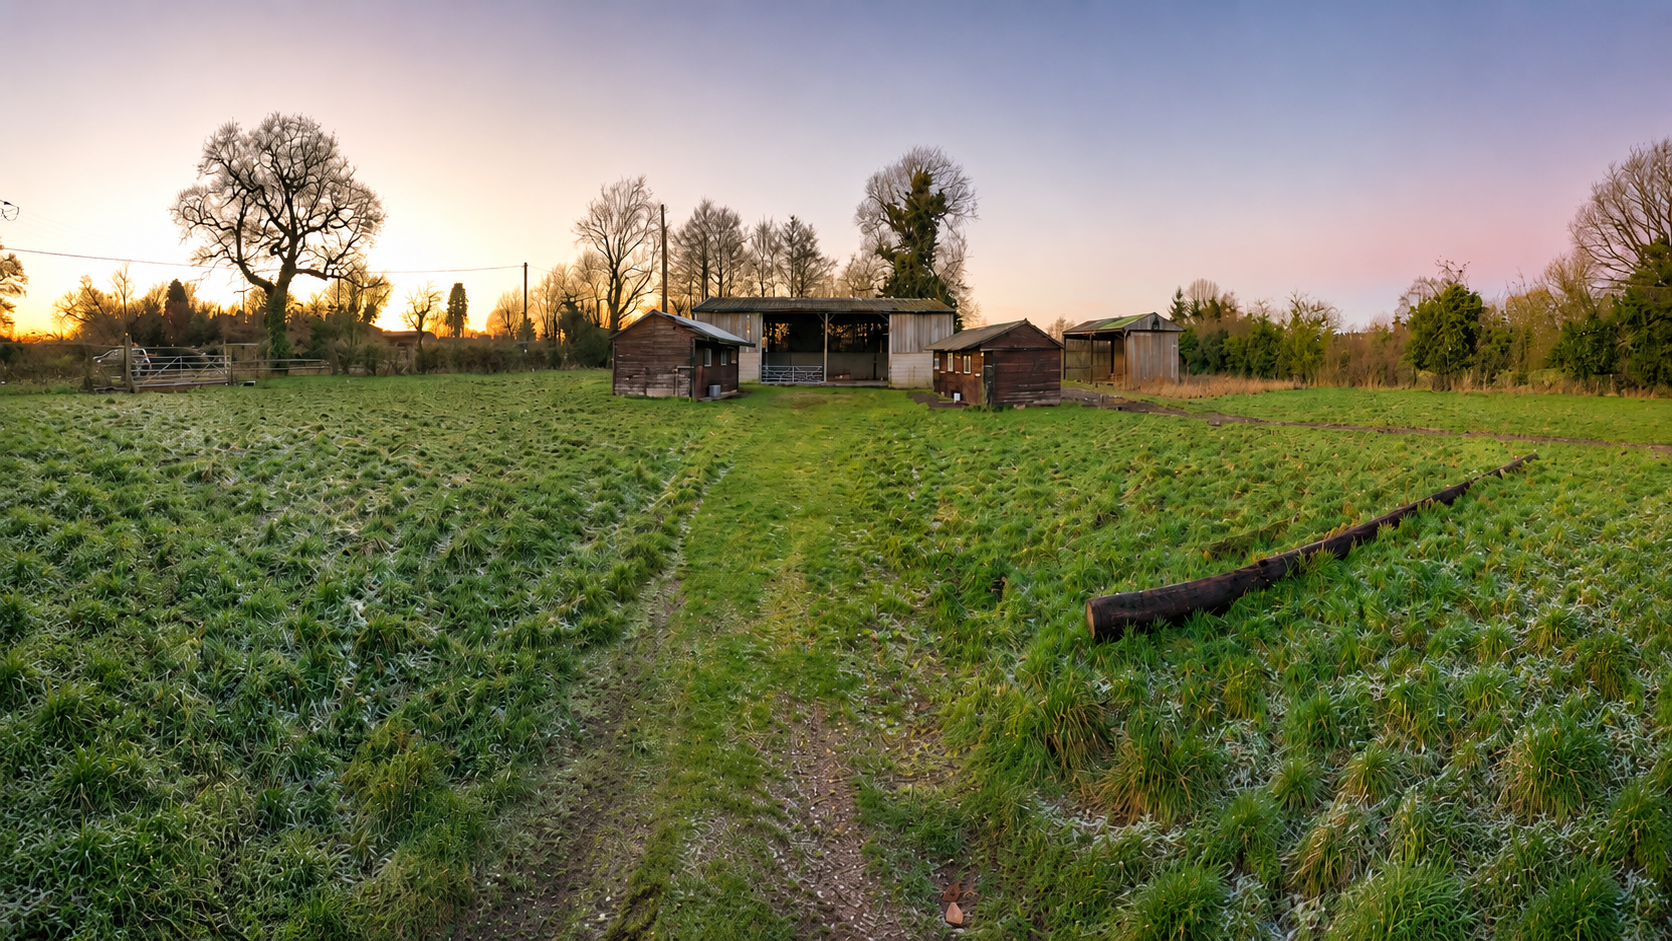
In January 2018, Holmshaw Barn was a slightly worn agricultural structure sitting in a semi-rural setting in South Cheshire. Frostbitten grass, Corrugated sheets, A cluster of outbuildings that had seen better decades. Viewed from the field, it was difficult to imagine that anything significant could become of it.
The structure itself was a functional agricultural shell; concrete block walls, a steel portal frame, an industrial roof. It was not listed. It had no heritage constraints beyond its agricultural planning consent. But it also had no insulation, no suitable floor slab, no services, no first floor, no habitable space of any kind.
What it did have was potential, a decent footprint and planning permission to convert it into a home. Daniel Matthias of DMA Architecture did a fantastic job of maximising the design and working through the planning application. The plans alone were enough to get excited about, set against the reality of what stood in the field.
The Goal Nobody Thought Was Realistic
The target was to convert and vertically expand the building into a 300m² contemporary home, plus a detached double garage, for a total budget of £300,000 including all external works and landscaping. That meant delivering the main building for under £800 per square metre.
For context: The typical benchmark for a new build of equivalent specification in the North West in 2018/19 was comfortably above £1,500/m² when delivered by a main contractor. For a conversion with the structural complexity of adding a full first floor, new steel, new roof, and extensive glazing, the figure was likely higher.
The ambition was not just to build a standard house. It was to build one that respected its surroundings while bringing a modern, contemporary look to the property with floor-to-ceiling architectural glazing across the front elevation, exposed structural steelwork, a double-height open-plan living space and a first-floor gallery landing with oak and glass balustrade.
None of those are budget finishes yet the budget was, by any conventional measure, tight.
There was no main contractor, no project manager, no quantity surveyor on retainer. Just a determined owner, a collection of specialist trades and the conviction that the difference between a £500k build and a £300k build is not quality but management.
The Reality Check
The romantic version of a self-build starts with architectural drawings, mood boards and exciting plans. The real version started on a freezing January morning in 2018.
I remember standing in snow boots watching a digger cut the first access track through the frost-hardened ground. It was one of those moments every self-builder imagines, the beginning of something significant. The excitement lasted about a day.
Over the following week and a half I found myself freezing cold, shifting broken concrete as the existing slab was pecked out by machine and the new footings were prepared. The reality of what I'd taken on arrived very quickly. This wasn't a television renovation programme. It was physical, messy and relentless.
That lesson repeated itself throughout the project.
I learnt that angle-grinder sparks are significantly hotter than they look when you're removing old steelwork. I spent days cutting utility channels into existing concrete walls and floors, emerging covered in white dust everywhere except the parts protected by my mask. After long sessions with the concrete grinder, my hands felt like they were still vibrating three days later.
Looking back, those experiences gave me an enormous appreciation for the tradespeople who do this work every single day. As someone in his early thirties at the time, I found many aspects of the project physically demanding. The people who build our homes do this week after week, often in difficult conditions and it gave me a level of respect for the industry I simply didn't have before the project began.
The Core Approach
This project was not delivered cheaply by cutting corners. It was delivered efficiently by eliminating waste.
The distinction matters. Cheap means inferior materials, rushed trades and a finished product that disappoints. Efficient means the same skilled tradespeople, the same specification products and the same quality outcomes but without the outsourcing of management cost, trade coordination, procurement of materials and negotiations with suppliers that, rightfully, increase every main contractor quote.
What followed was 14 months of intensive hands-on management that would eventually become the direct inspiration for BuildaPath.
Part Two: The Build — Strategy, Pressure and Progress
Starting from the Ground Up
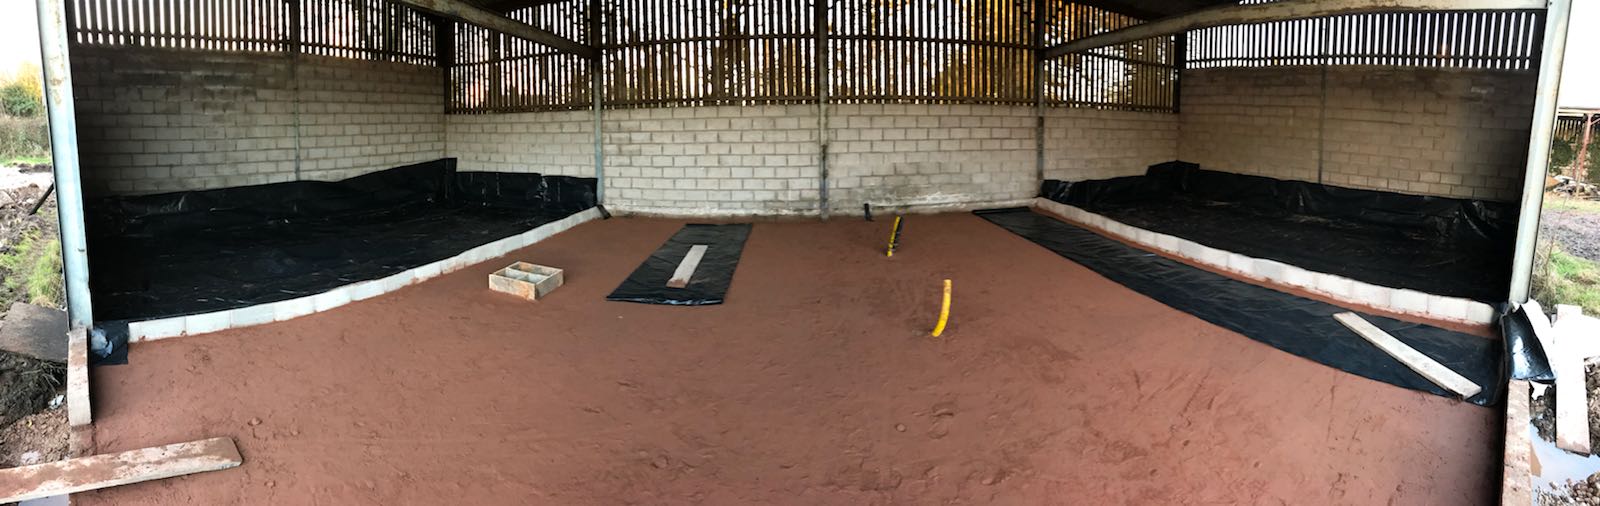
The first task was digging out the old slab, digging footings and pouring new foundations. With the existing agricultural floor stripped back and the ground prepared, the ground floor slab was cast across the full footprint. Standing inside the empty shell at that stage, membrane down, sand blinded, services roughed in, the scale of what was being attempted became real.
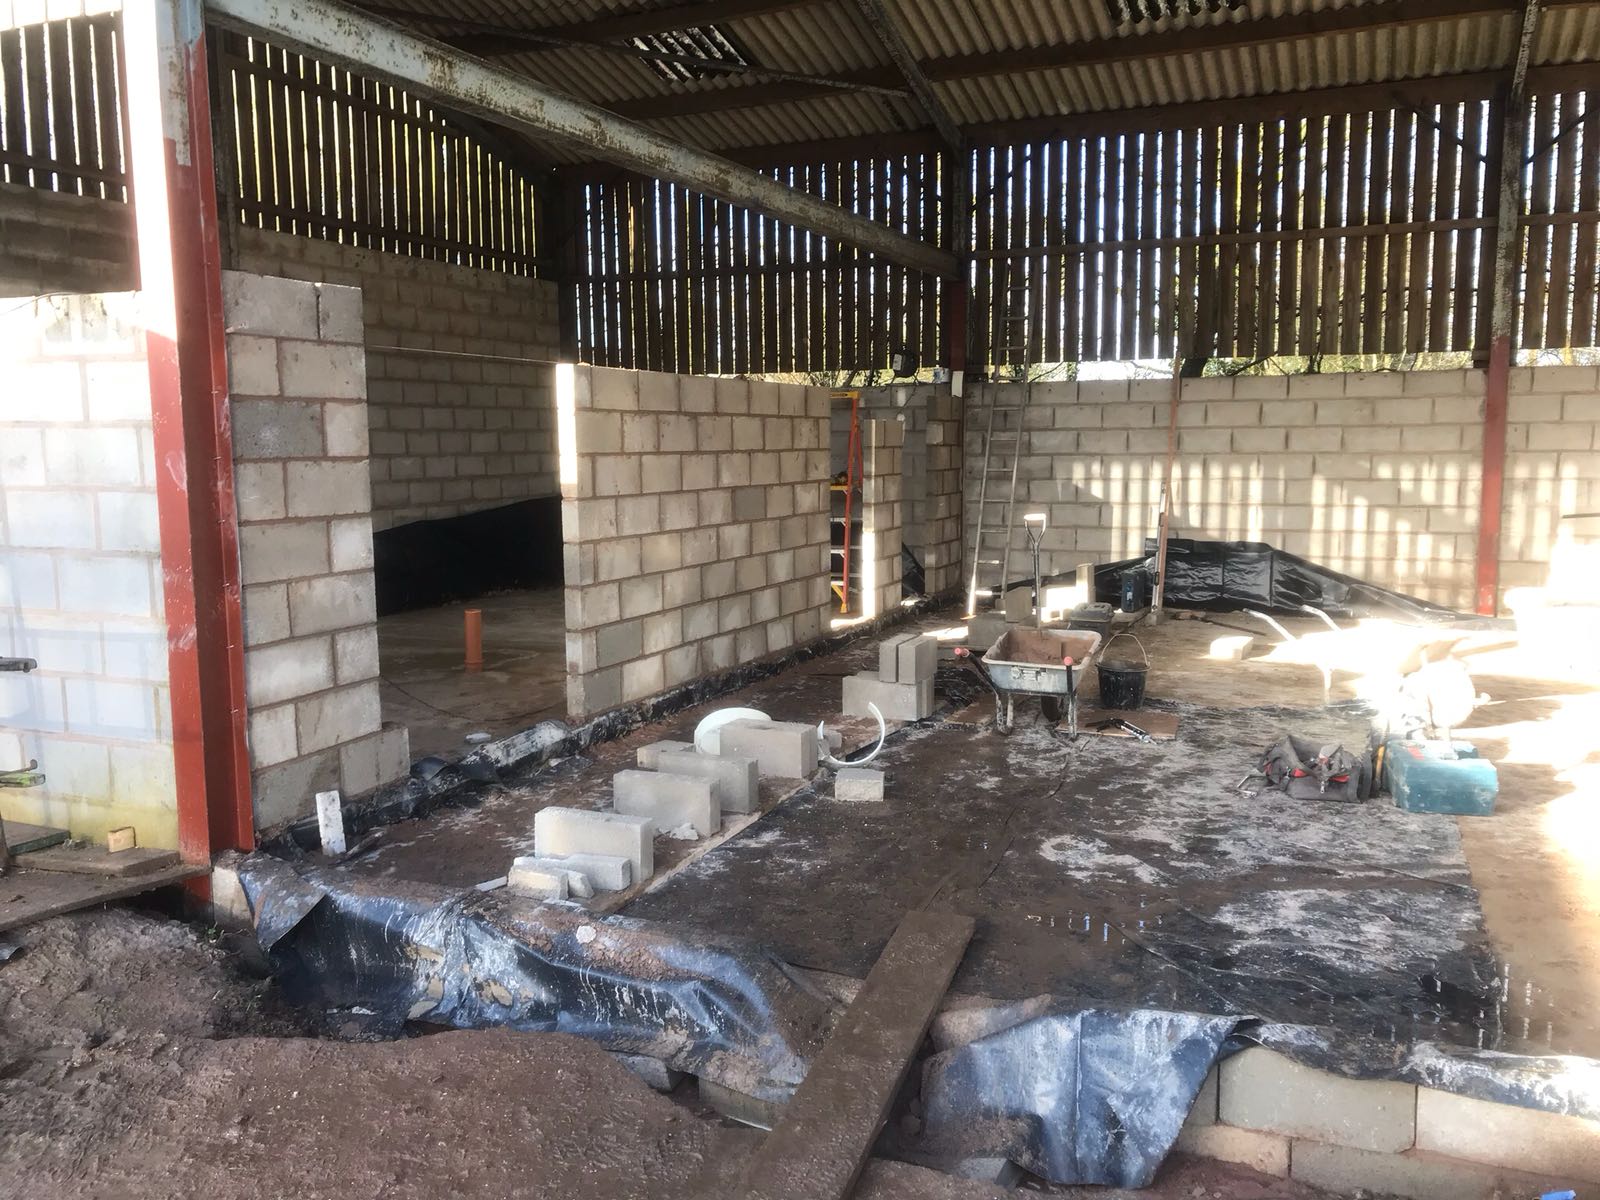
The superstructure work began immediately after. The existing single-storey block walls were built up, new internal partitions established and the structural steel installed to carry the first floor. Every beam had to be sized, specified and sequenced correctly in collaboration with our structural engineer, Steve Clarkson. Get that wrong and the floor structure above has nowhere to sit.
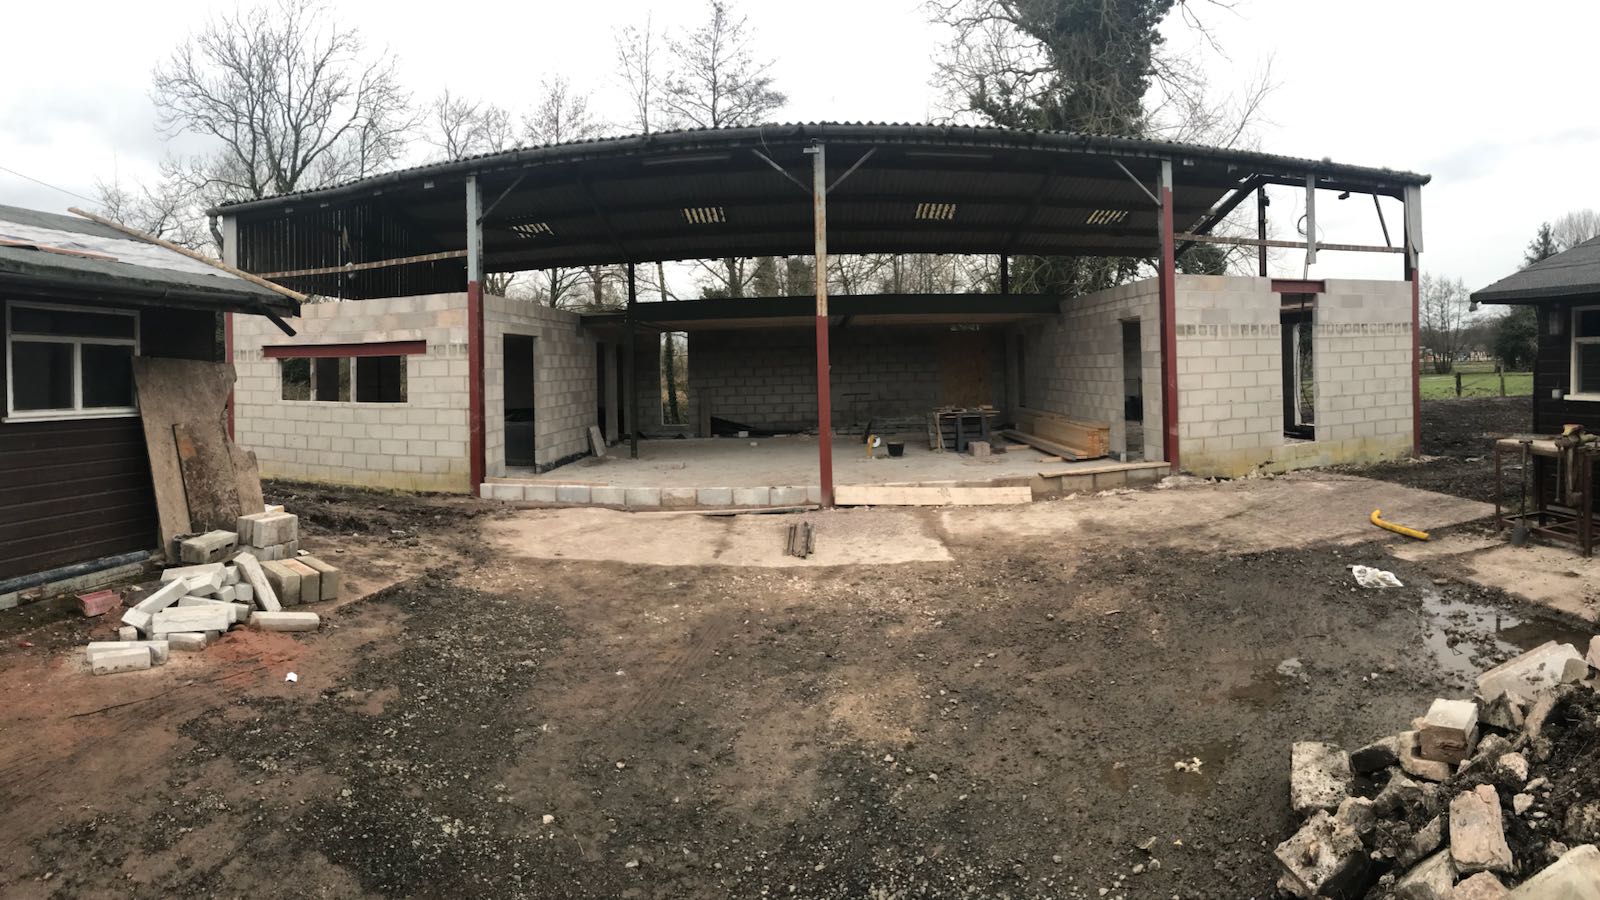
The first lift of blockwork visible from the exterior showed the building beginning to grow beyond its original floor space for the first time. The old corrugated roof, which had been retained throughout the ground floor works to protect the site from weather, was eventually stripped back entirely to allow the first floor superstructure to proceed.
Building the First Floor
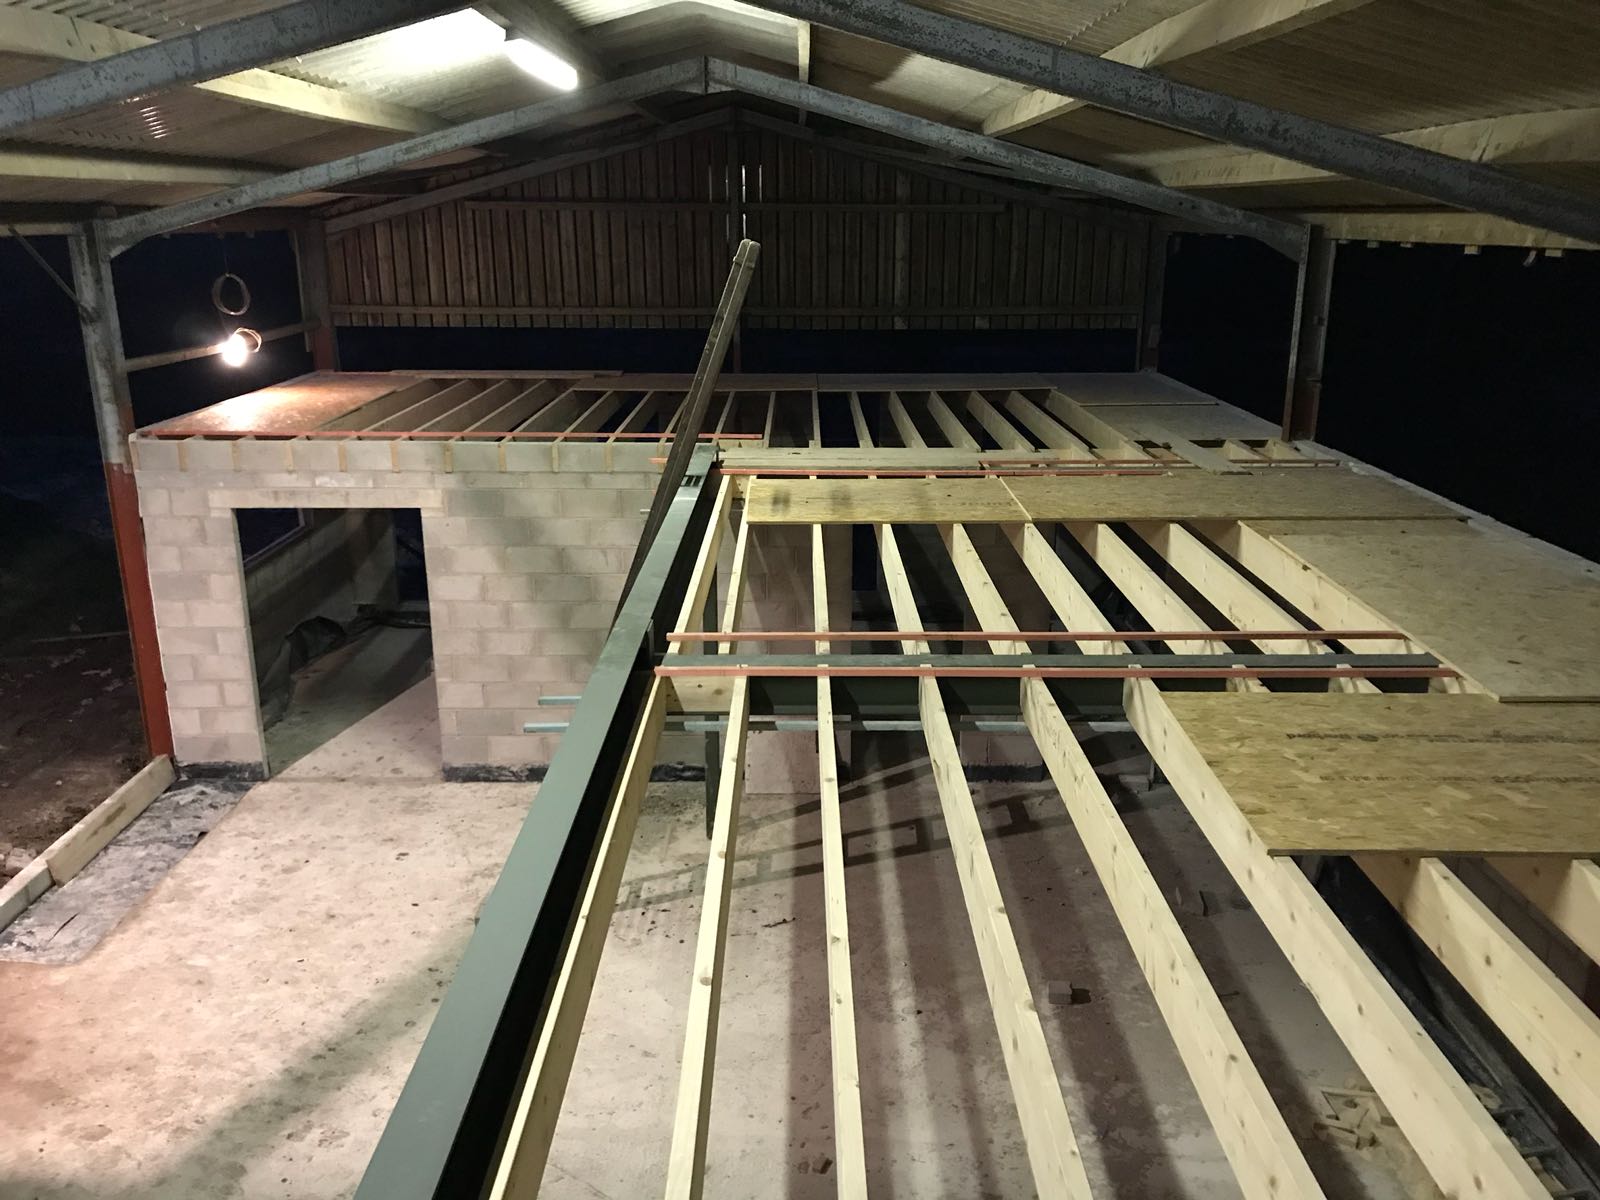
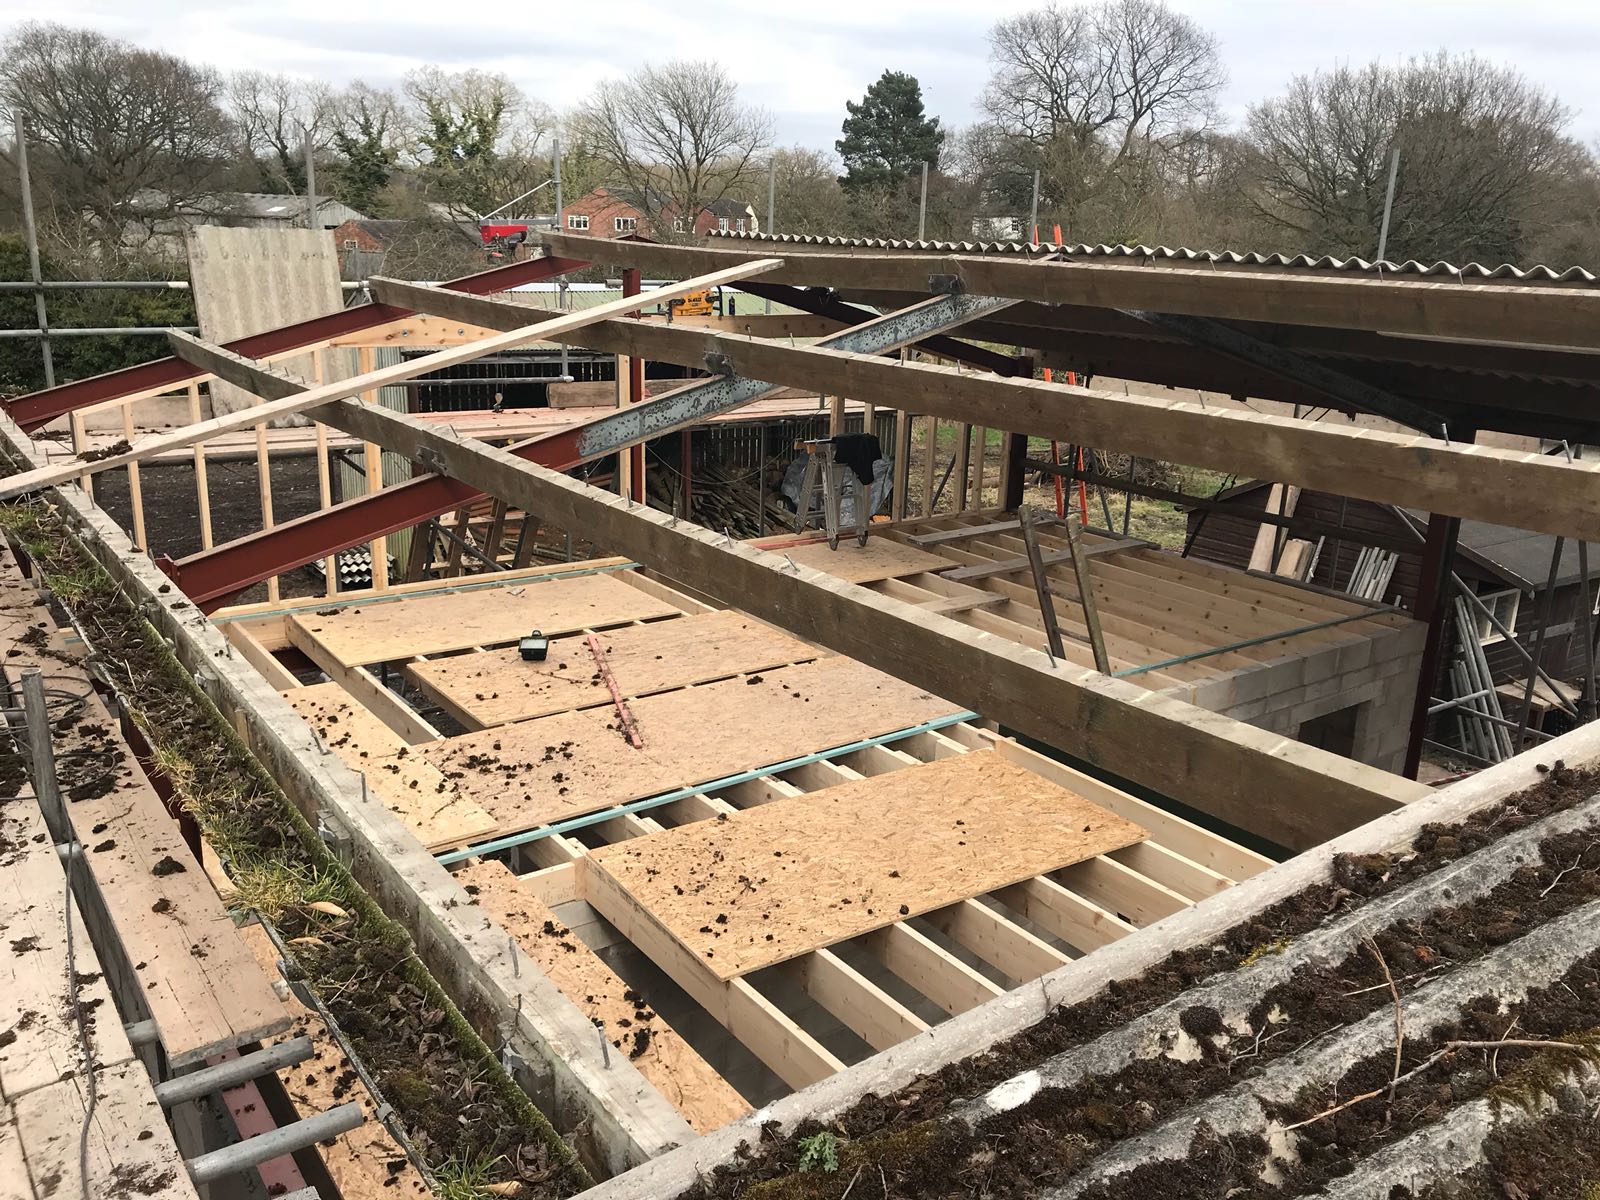
The first floor timber frame and floor joists went in during what felt like the most structurally dramatic phase of the project. Looking up from ground level at the new floor structure spanning the entire volume of the building, with the sky visible through where the old roof had been, was the moment the conversion stopped looking like a renovation and started looking like something else entirely.
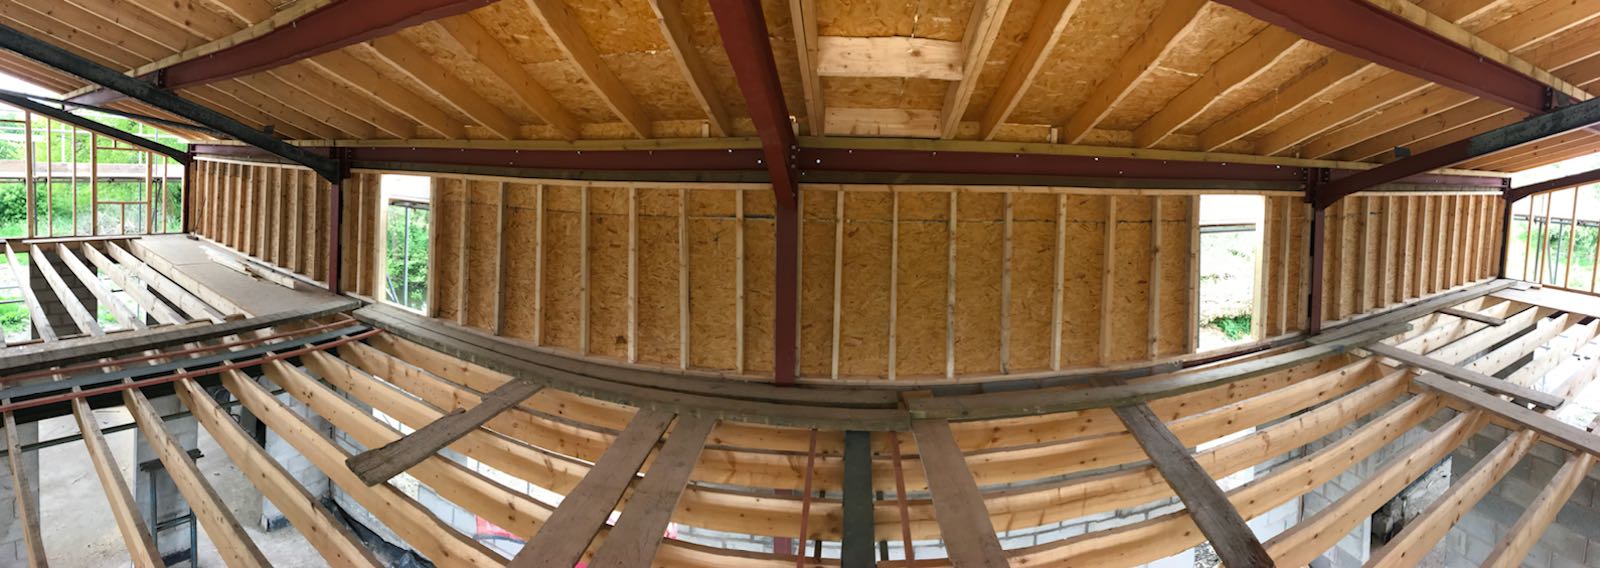
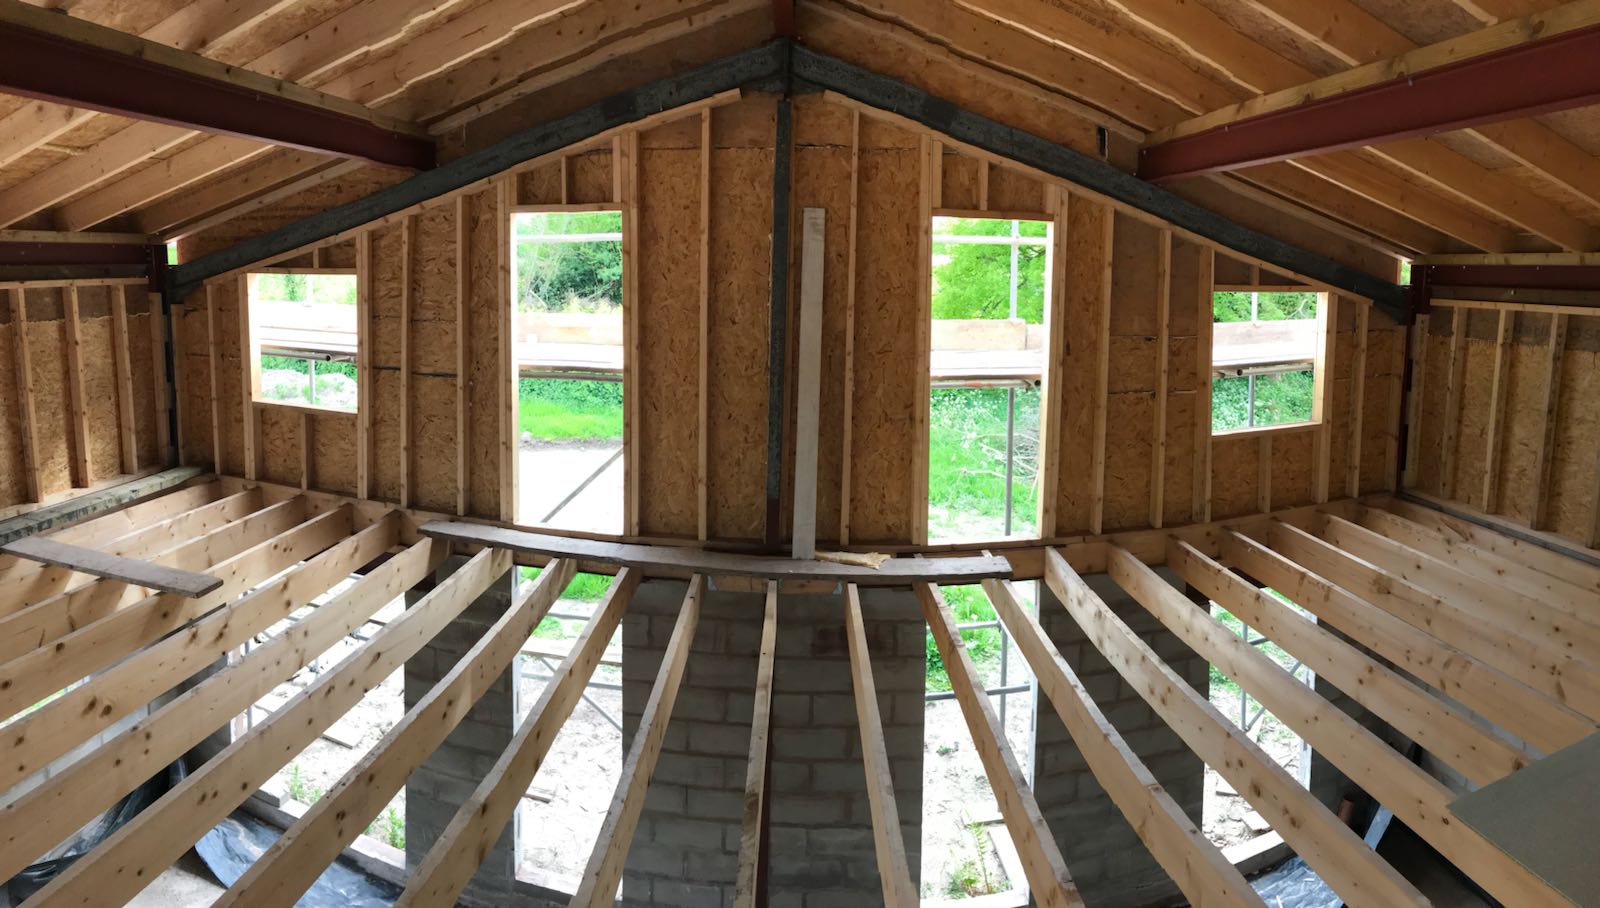
Inside the new first floor shell, the scale of the space became apparent. The original steel portal frame of the barn had been retained and incorporated into the new structure, a design decision that would later give the building much of its character. The combination of timber stud walls, OSB sheathing and the retained steel created a structural aesthetic that could not have been designed from scratch.
One of the first significant cost-saving decisions was installing over 200m² of rigid Celotex insulation before the slab was poured. Unlike some of the later insulation tasks, this was surprisingly enjoyable work. The real challenge came later.
For the first floor and roof structure I chose a combination of Actis Hybris insulation and H-Control reflective membrane. The thermal performance was excellent and the cost compared favourably with alternatives but installation was genuinely labour intensive.
Countless weekends were spent cutting insulation panels, fixing battens and wrapping the entire upper floor structure with the H-Control reflective blanket, much of it done alone. More than once I managed to staple my own thumb while working overhead. Despite that, I'd make the same decision again. The system performs exceptionally well in terms of thermal efficiency and delivered meaningful savings against alternative approaches. The only thing I'd change is persuading someone else to help me install it.
Making It Weather Tight
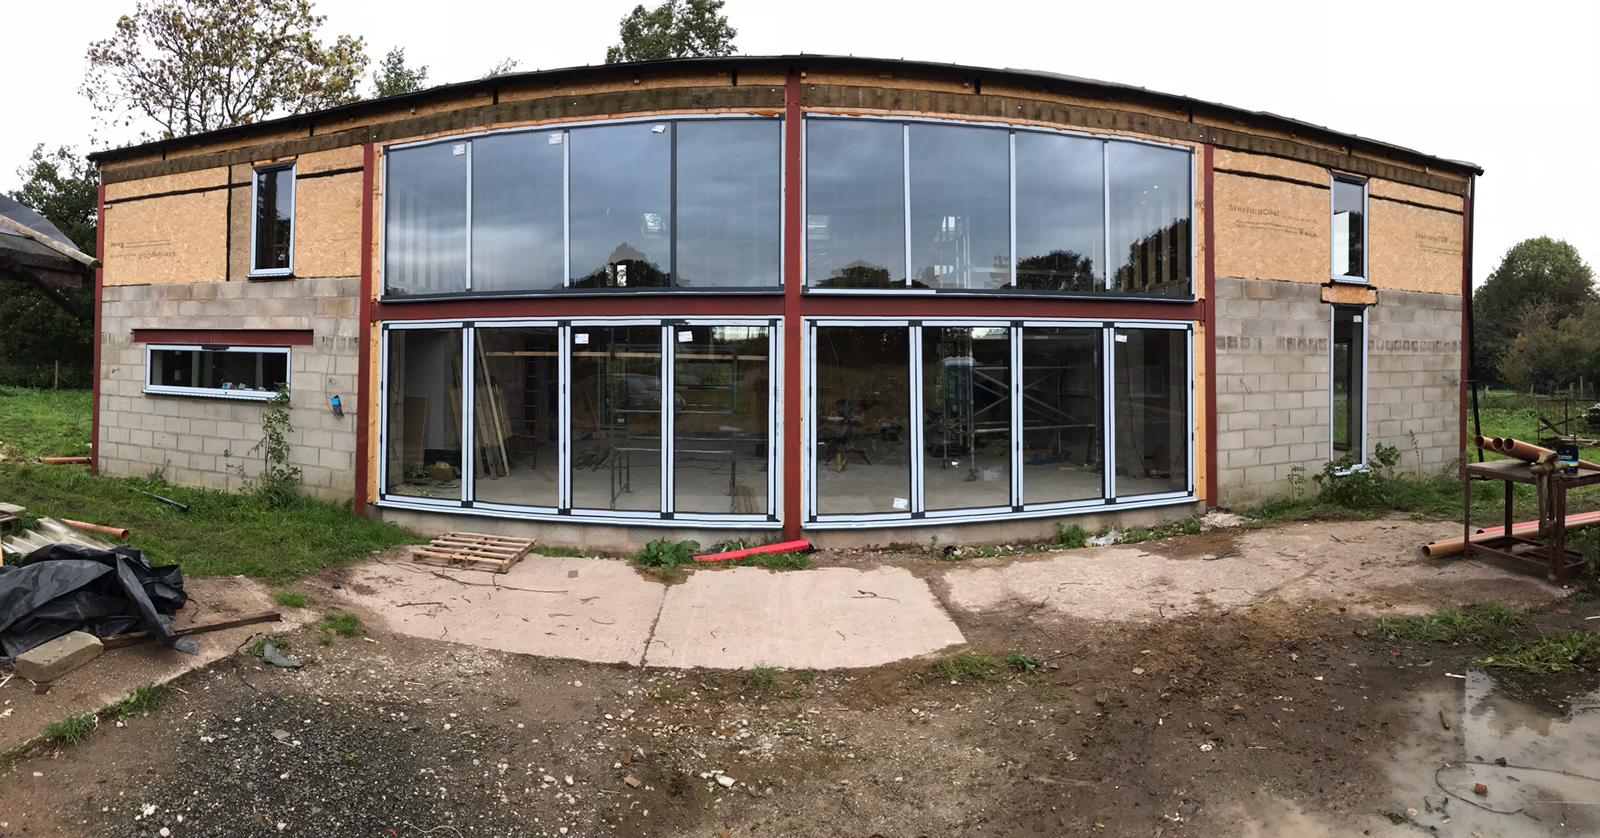
The moment the windows and glazing went in was the moment the project crossed a threshold. The front elevation, a nearcontinuous run of aluminium-framed glazing across both floors, transformed what had been a building site into something that looked finished from the outside, even while it remained a shell internally.
The glazing had been specified and ordered months earlier. Lead times on architectural aluminium frames are long and getting the specification wrong at this stage would have been catastrophic. Structural openings were committed long before the frames arrive. This was one of the moments where the decisions-before-they-feel-necessary discipline genuinely protected the project.
Seeing the glazing installed by Steve Rimmer of Homestyle Property Improvements was one of the most satisfying moments of the entire build. For months the project had felt like structure, steel, insulation and endless tasks. Suddenly there was a recognisable building emerging from the site. The double height glazed elevation completely transformed what the barn had been.
It was the first point where people could understand what the finished building might eventually become.
The Day the Scaffolding Came Down
For months I had only seen the building through scaffolding poles, boards and netting.
When the scaffolding finally came down I stood back and saw the entire building properly for the first time. The glazing was in. The roof profile was visible. The vision that had existed only in drawings suddenly existed in reality.
The Messy Middle: First Fix to Plasterboard
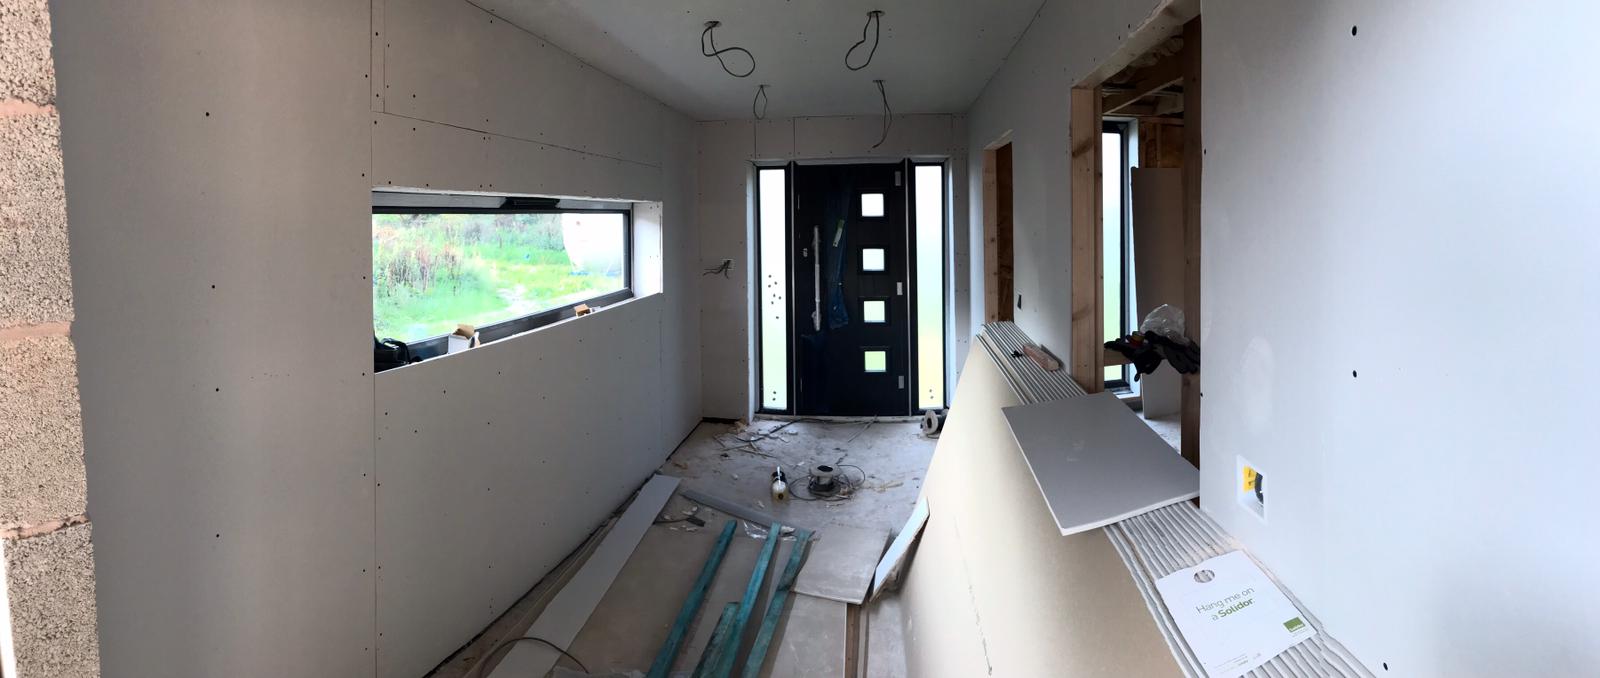
If the structural phases are the visible drama of a self-build, first and second fix are where projects quietly fall apart. The sequence matters enormously. Electricians need to be in before plasterers, plumbers need to complete runs before floors go down. If one trade is late, the next cannot start and idle trade time on a self-managed project is money spent on nothing.
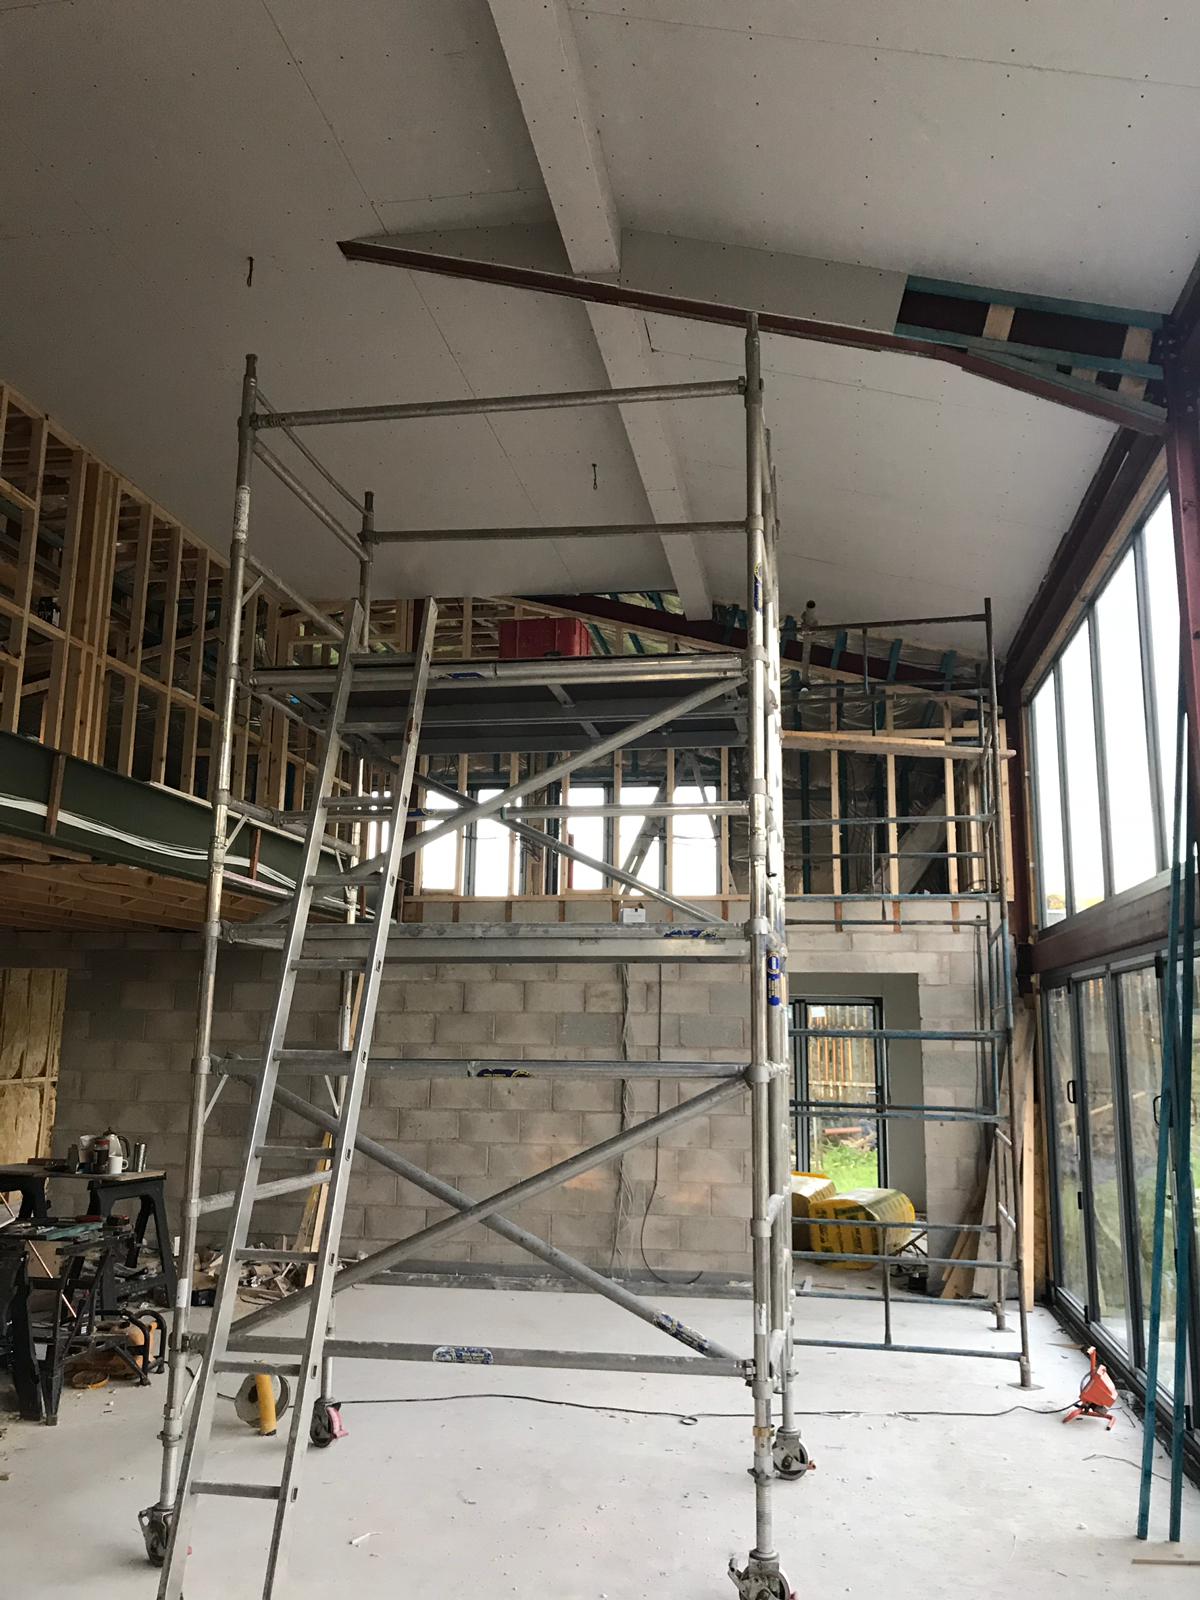
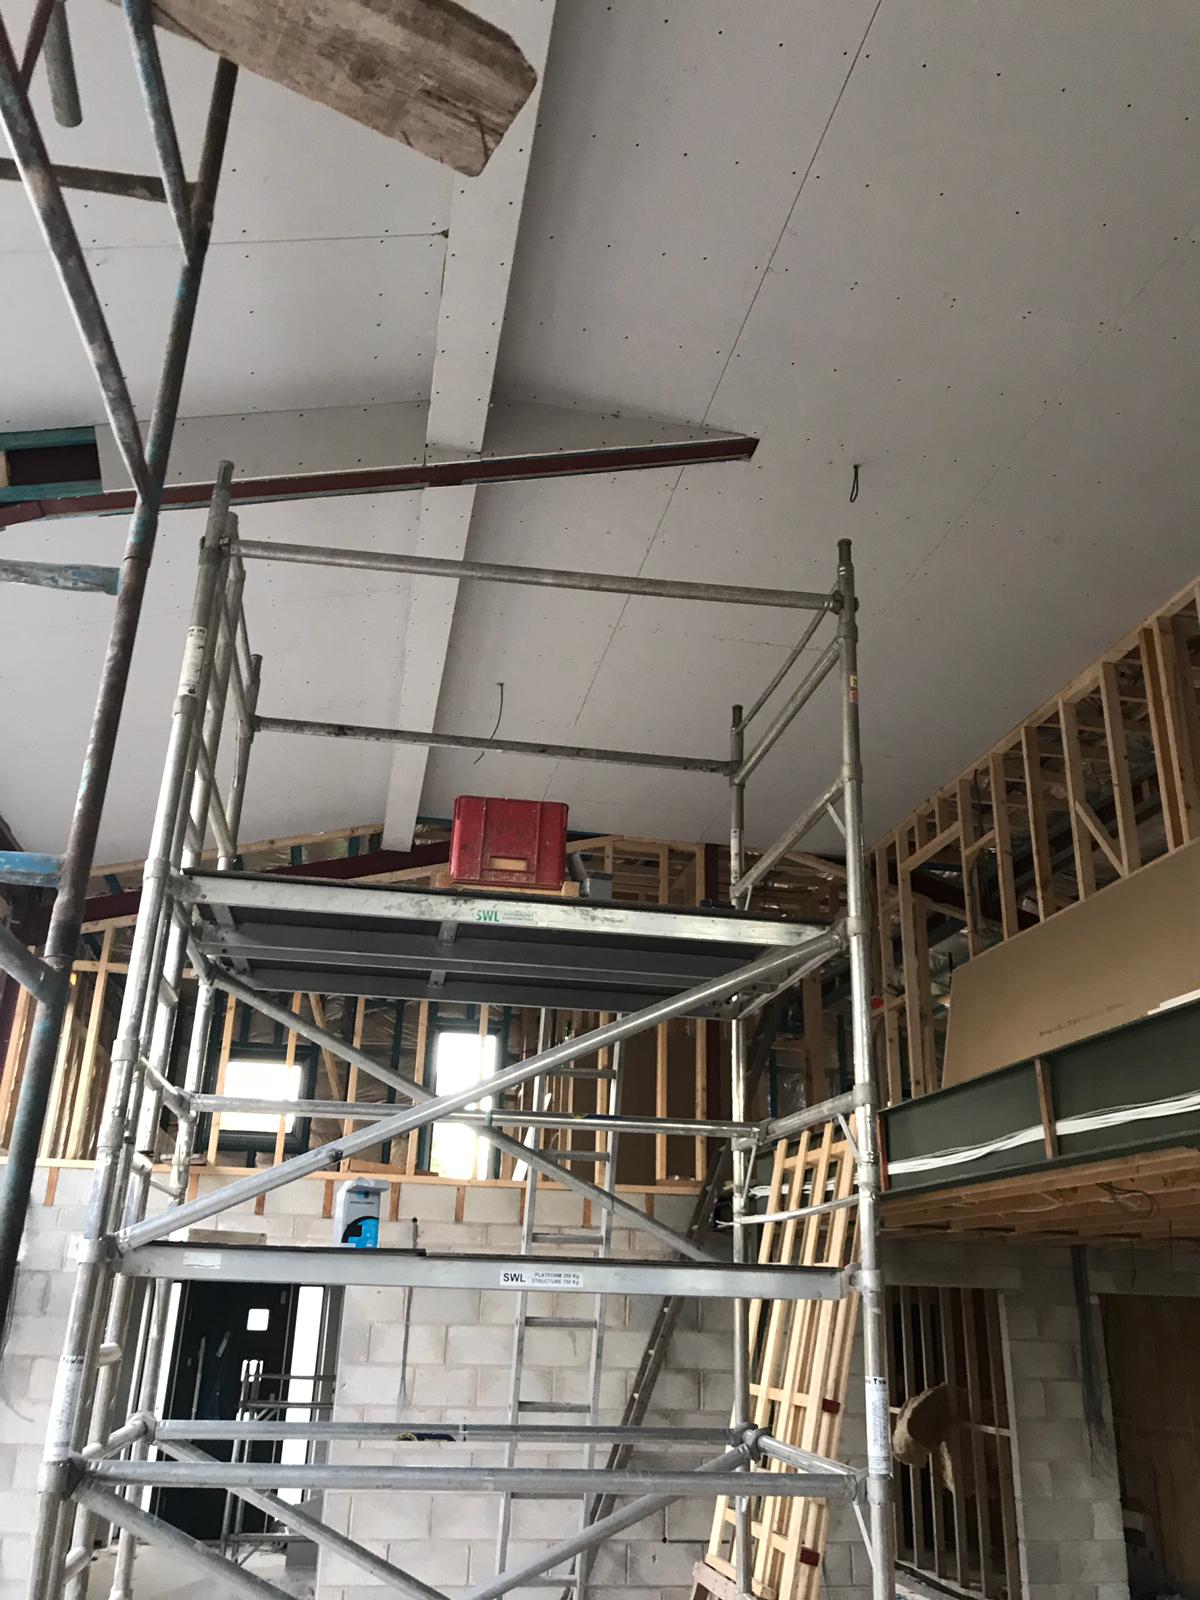
The scaffolding towers inside the double height volume illustrated the complexity. Plasterboarding a vaulted ceiling at five metres without scaffolding is not possible. But scaffolding takes time to erect, adjust and clear. The sequencing of plastering, electrical first fix and boarding was managed as a live logistics problem throughout this phase with trades scheduled in according to what was actually ready rather than on fixed weekly rotas.
The site was kept clean throughout by me and friends who helped at various stages. Not as a matter of preference, but as a deliberate productivity strategy. A clean site made trades faster. They don't spend time finding tools, moving materials around or working in conditions that slow them down.
Throughout much of the build, Phil Evans was the constant presence. While other trades came and went as phases changed, Phil remained from start to finish and became instrumental in keeping the project moving. Colin Ledgar handled all the electrical works and spent many weekends alongside me fitting plasterboard to help with both time and cost. The value of that kind of approach, where tradespeople understand the project's constraints and adapt accordingly, is impossible to fully quantify but shows up in the final number.
Part Three: Delivery, Lessons, and Why BuildaPath Exists
The Finished Result
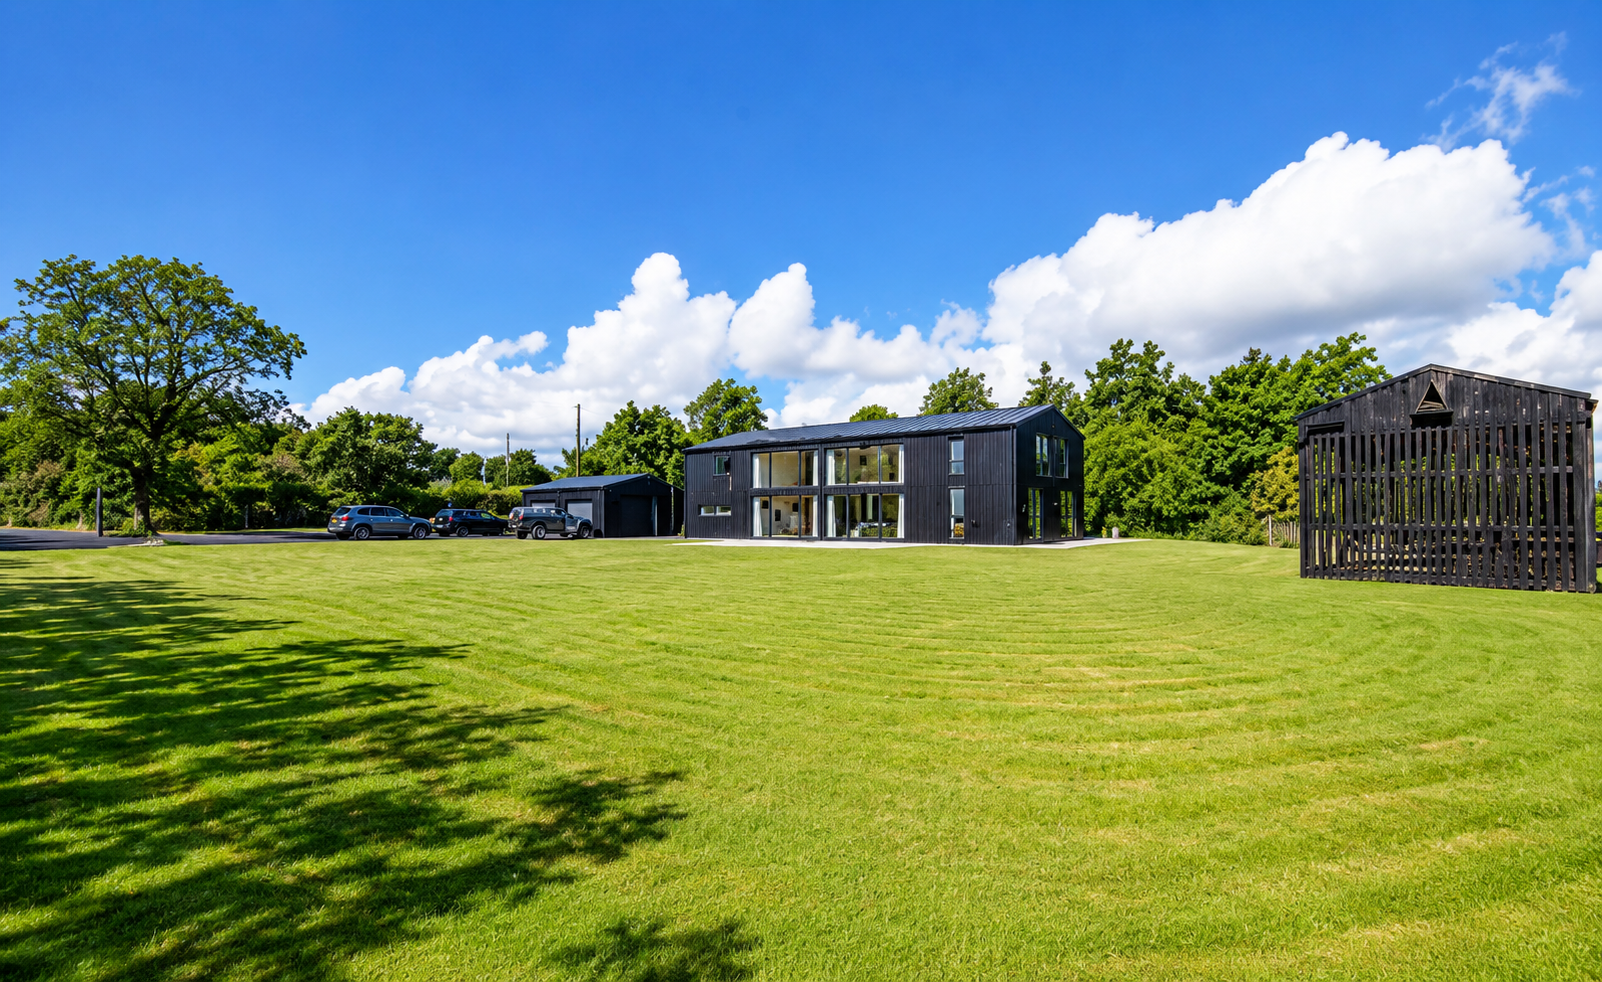
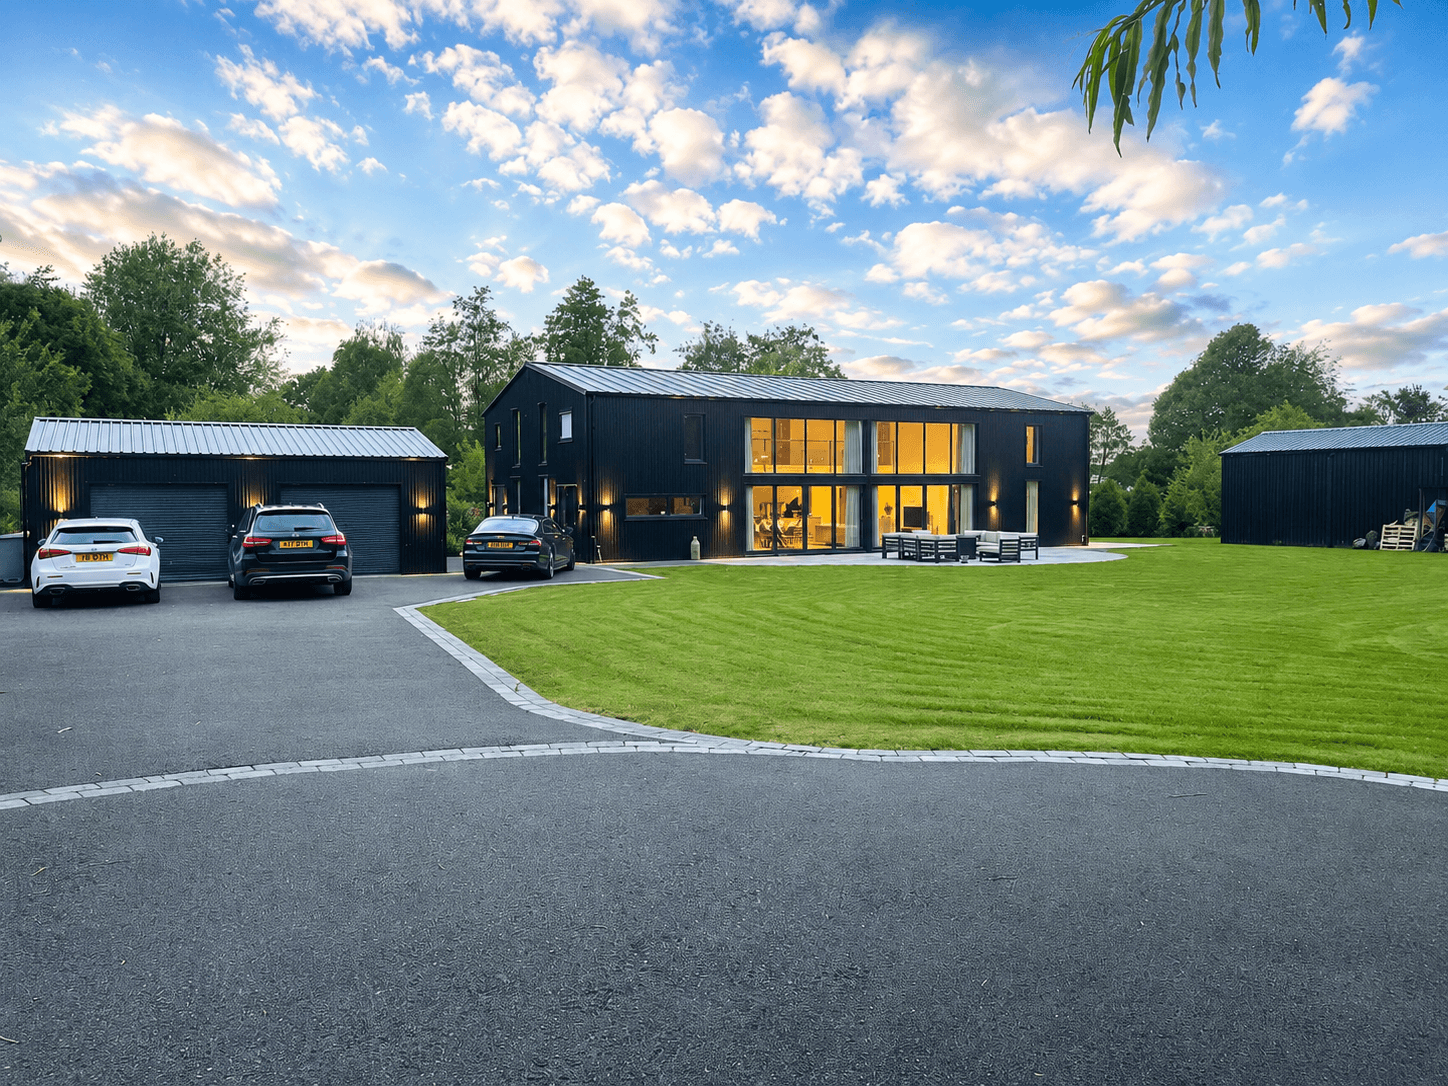
The completed exterior of Holmshaw Barn bears almost no visual relationship to the agricultural structure that existed before. Black corrugated steel cladding, chosen deliberately to reference the agricultural surroundings of the original building while delivering a contemporary aesthetic, wraps the entire facade. The roofline of the original portal frame is preserved in the profile of the new standing seam metal roof.
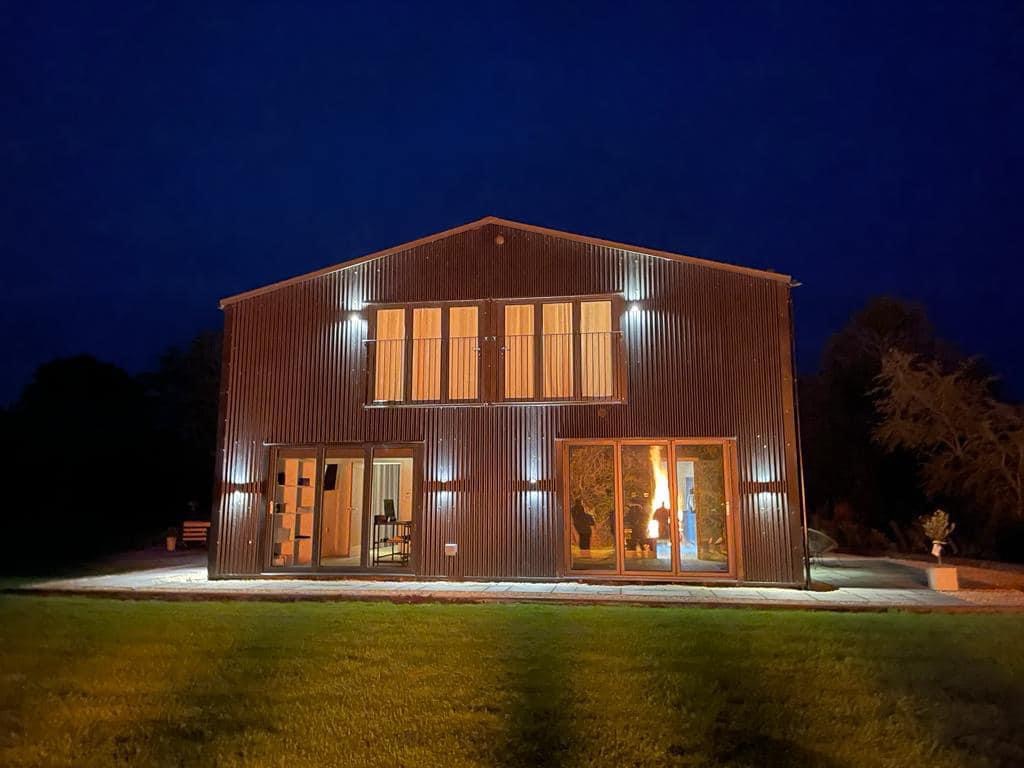
At night, the building transforms again. The floor-to-ceiling glazing on the front and side elevations floods soft light outward across the lawns and terraces. What reads as bold and dark in daylight becomes warm and inviting after dark.
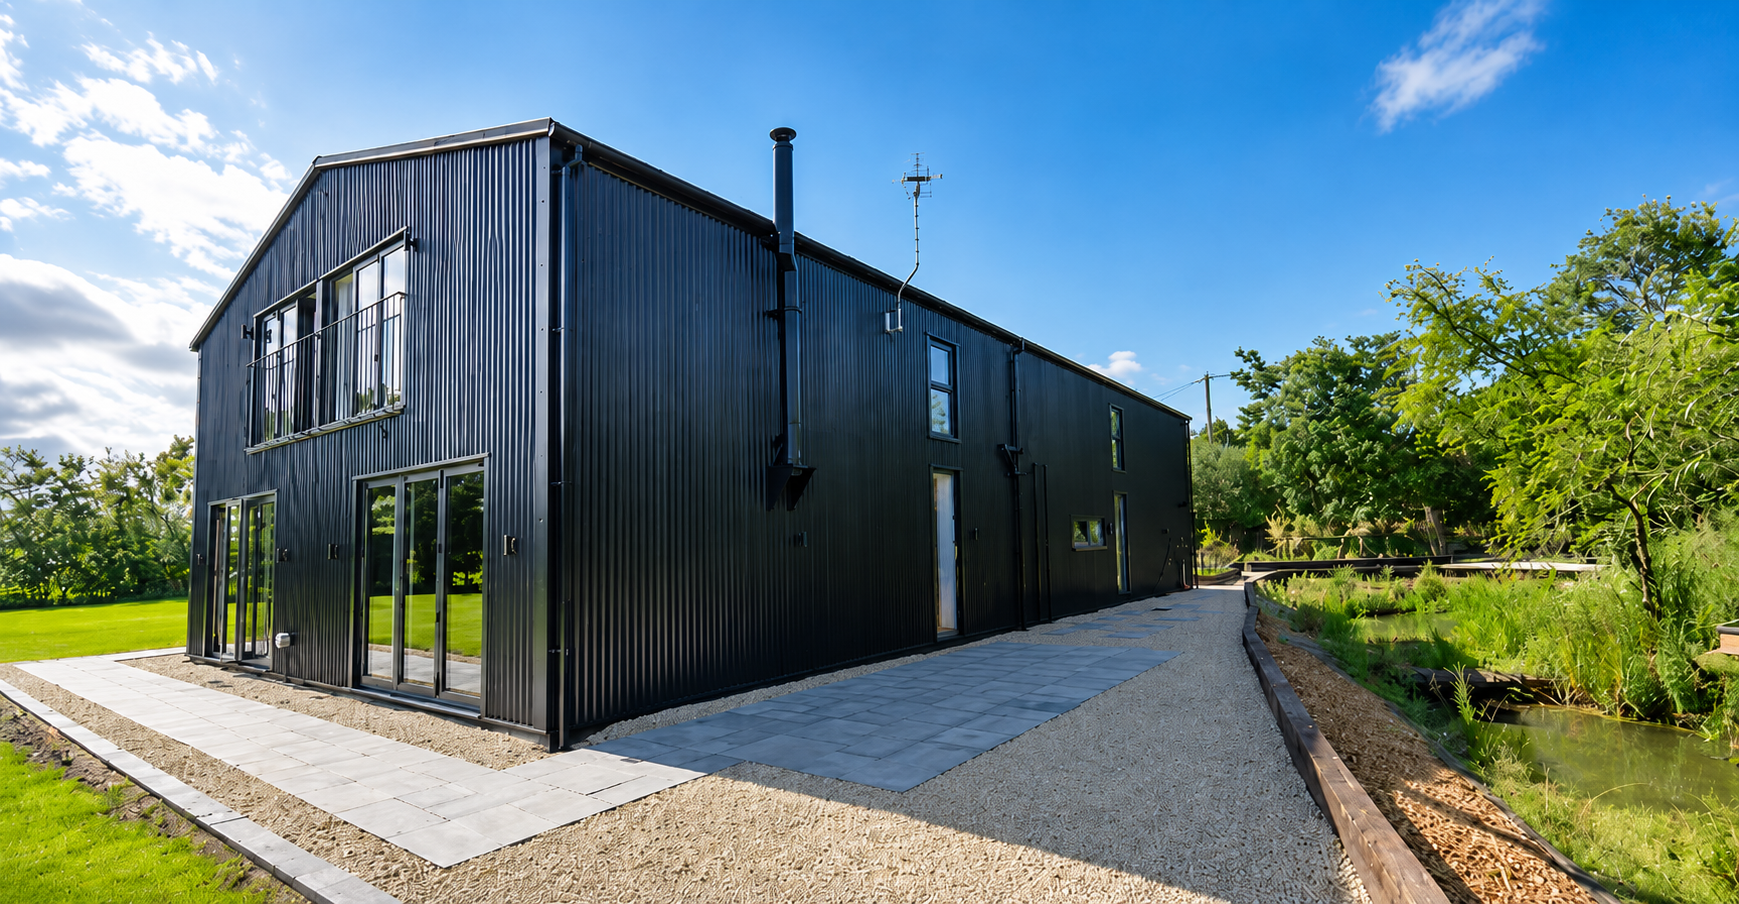
The landscaping and matching detached double garage, completed as the final phase by Ben Ledgar with Phil Evans continuing to support, framed the building properly for the first time. The curved driveway leading to the 8m wide double garage, the natural pond running along the eastern boundary, the 200m2 Indian stone paving and gravel paths and the lawns (landscaped by Jake Bourne-Withey) that wrap the building all required the same planning and sequencing discipline as the build itself.
Inside: Specification Without Compromise
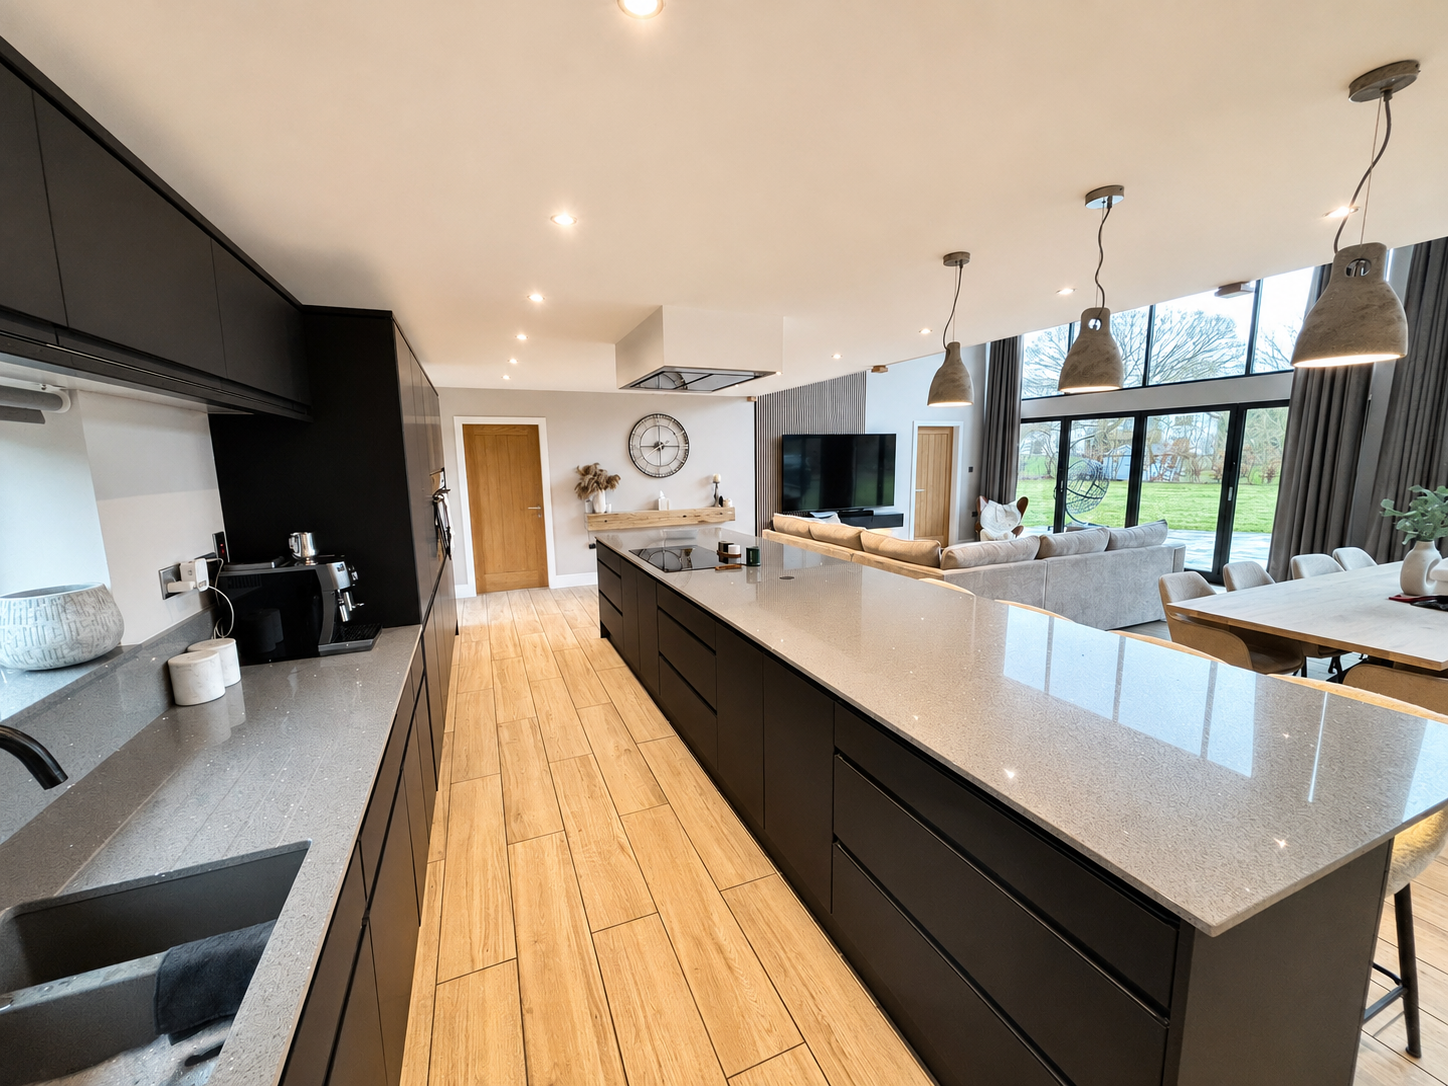
The kitchen-living space on the ground floor is where the financial discipline of the project is most visible because you cannot see it at all. There is nothing here that reads as a budget compromise. Dark handleless cabinetry, engineered stone worktops, full-height units, large-format floor tiles running continuous across kitchen, dining and living zones, all blend together into one flowing space. Flush LED lighting profiles, architectural pendant lighting and the full-width glazed wall to the garden add to the complete feel of the main room.
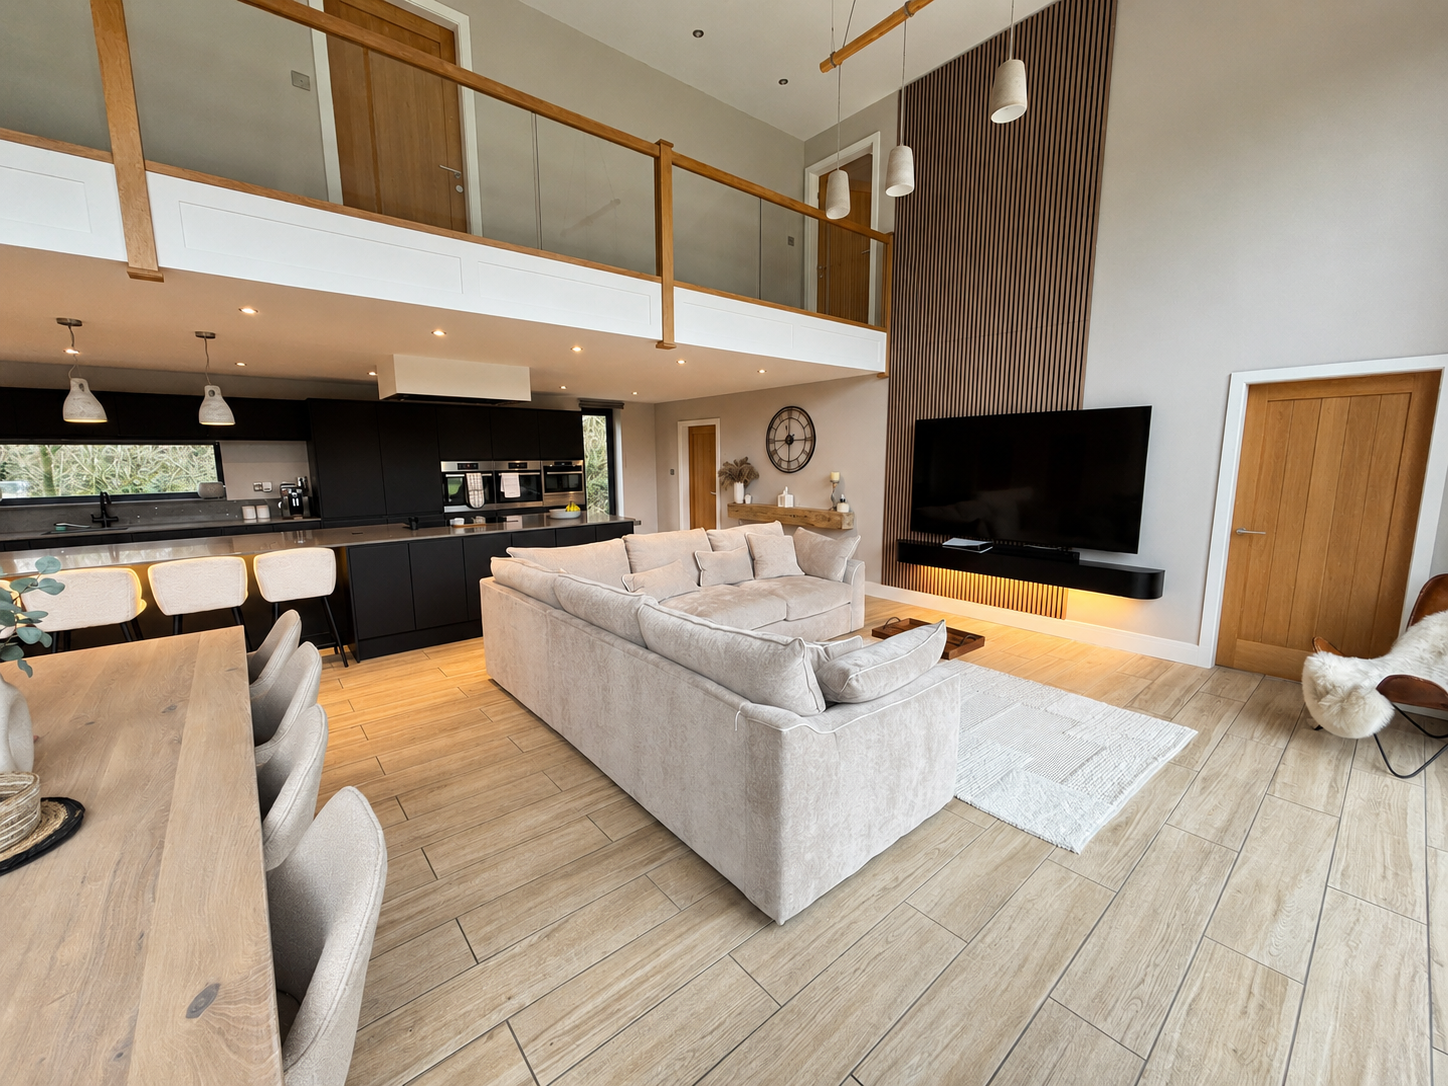
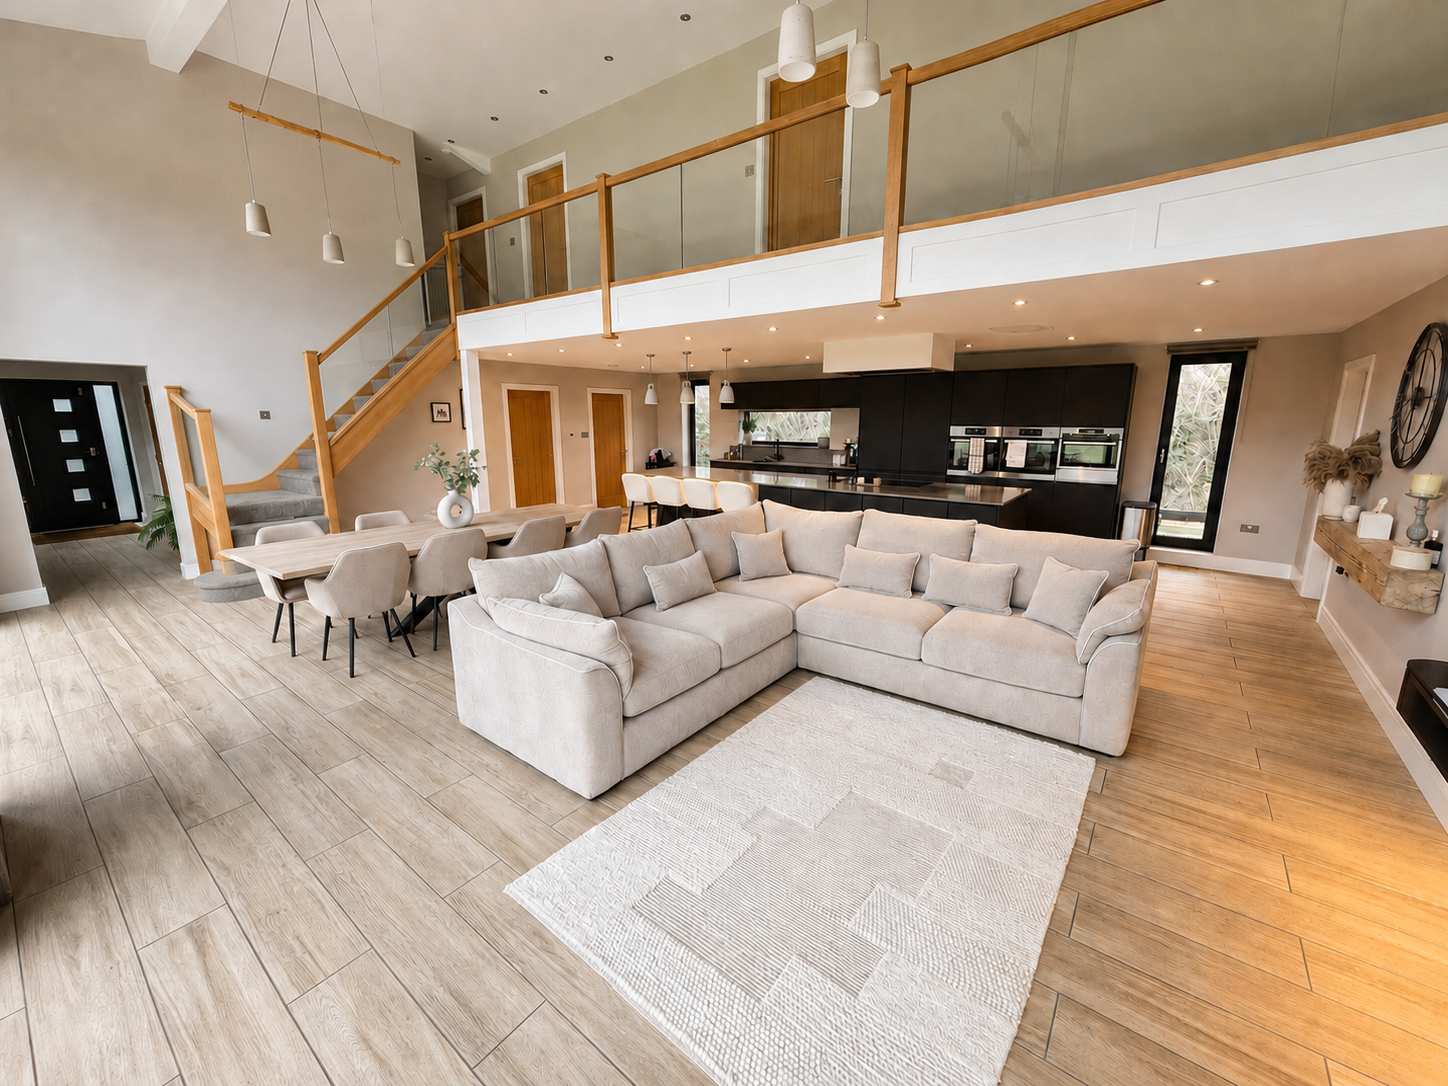
The double-height open plan, the spatial moment the whole project was designed around, is where the building makes its fullest argument. The oak staircase, the glass balustrade, the vaulted ceiling, the full-height slatted media wall; none of these were compromised for cost reductions. They were protected by the discipline applied in the phases that came before them and attracted less attention.
The Numbers
The final delivered cost of the main building came in under £800/m² on 300m² of floor area. Including the double garage and all external works (driveway, landscaping, paving, drainage and site boundary works) the all-in cost was approximately £1,000/m². Total project spend: £300,000.
For a building of this specification, in this location, delivered by a main contractor, the equivalent cost would have been materially higher. The saving was not achieved by buying inferior products. It was achieved through:
- Eliminating the main contractor management layer entirely
- Facilitating trades to be productive through intensive coordination and site support
- Sourcing materials through multiple competing merchants, with Jewson as the primary account
- Breaking supply-and-fit packages into separate supply and installation contracts
- Making decisions earlier than they felt necessary
- Taking on lower skill tasks personally to protect trade time for skilled work
One of the biggest savings came through procurement. One example was with the tiling. The decision to tile the entire ground floor in a consistent run across the kitchen, dining, living, hallway and downstairs bathroom, all in the same large-format tile, created a significant volume order. That volume became a negotiation. Tile Mountain provided strong pricing precisely because the order was consistent and substantial.
The installation challenge then fell to Dave Evans who had to lay the tile across multiple interconnected spaces with every grid line perfectly aligned at every transition. The result is one of my favourite elements of the house.
The Moment Everything Nearly Came Apart
The hardest part of the project wasn't structural, wasn't physical, it wasn't even financial in the traditional sense. It was visibility and control.
The project was funded through a self-build mortgage arranged via BuildStore and provided by Darlington Building Society. Both were excellent. BuildStore helped navigate the mortgage market from the outset and connected me with Darlington, who believed in the project from the start. BuildZone provided the structural warranty after several alternative providers returned significantly higher quotes.
But being a first-time self-builder, the level of information required to create and maintain a credible plan and budget position at every funding milestone was something I hadn't fully anticipated.
Every stage payment release created a new pressure point. Before each drawdown, I needed to know exactly where the project stood, not just what had been spent, but what had been committed, what invoices were about to arrive, what deposits were due and what needed paying before the next funding release landed in the account.
That meant constantly maintaining and updating multiple spreadsheets to make sure they reflected the live reality on site.
The added challenge was that a percentage of the mortgage was retained until practical completion, meaning a portion of the funding technically existed but wasn't immediately available at the moments it was most needed.
Darlington were fantastic throughout. They released funds quickly once stage completions were verified and, towards the end of the build, released part of the retained tranche early to help bridge the finish line.
But none of that would have been possible if I hadn't been able to demonstrate exactly where the project stood at every stage.
The information I needed was scattered everywhere. Inspection reports sat in email inboxes; progress photographs lived on my phone; quotes and invoices were spread across various trades and suppliers; budget spreadsheets lived on a single laptop; bank transactions sat somewhere else entirely. The information existed but it wasn't connected.
At several points during the build, the relationship between money available, money committed, money spent and money still needed became genuinely difficult to see. Not because the project was over budget, but because spreadsheets are very good at recording what has happened and very poor at showing what is about to happen.
A single late decision like changing a window specification or adding new electrical points could quietly ripple forward through the programme. The cost surface weeks later through delays, additional labour, reordered materials, or knock-on effects elsewhere in the build.
There were evenings, genuinely stressful ones, spent trying to reconcile a working budget against a set of numbers that seemed to move faster than the spreadsheets could keep up with. Wondering whether the contingency would hold. Whether the glazing, kitchen and landscaping could all be afforded in sequence. Whether the cash position at one stage would still support the next.
Looking back, I wasn't struggling to understand how to build the house, I was struggling to maintain visibility over the house I was building.
Those evenings were the origin of BuildaPath.
Why BuildaPath Exists
The question that kept recurring during Holmshaw Barn was not "how much have I spent?" The spreadsheet could answer that. The question was:
Given everything I've committed, everything that's quoted but not yet invoiced and everything still to come:
Where does my project actually stand?
That question requires a liquidity model. A stage-by-stage view of funded position versus committed spend. A way of seeing not just current cash, but whether current cash covers the next deposit, the stage after and the one after that. A system that flags a funding gap before it becomes a crisis rather than after.
It also requires a confidence view, something that pulls together budget health, liquidity position, contingency remaining and sequencing status into a single honest signal. Not a guarantee, not a prediction, just an honest assessment of whether the project is under control or drifting.
No tool existed that did this for residential self-builders and converters. The tools that existed were either generic project management software with no financial intelligence or cost calculators that produced a single estimate and then went silent.
The frameworks used to manage Holmshaw Barn (the baseline versus working budget logic, the stage-by-stage cash tracking, the variance monitoring, the sequencing dependencies) were manual, time-consuming and brittle, but they worked. The project was delivered within budget because those frameworks existed, even in imperfect form, because I built them under pressure.
BuildaPath is what those frameworks look like when they are automated, connected, and available to anyone planning a self-build, conversion, extension or renovation without requiring them to become operational finance experts first.
Holmshaw Barn was the proof that the approach works. BuildaPath is the product that makes it accessible.
The People Behind Holmshaw Barn
No self-build is ever completed alone. Holmshaw Barn benefited from the expertise, commitment and hard work of a lot of people.
- BuildStore — Mortgage Broker
- Darlington Building Society — Mortgage Provider
- BuildZone — Structural Warranty
- DMA Architecture (Daniel Matthias) — Design and Planning
- Steve Clarkson — Structural Engineer
- Jewson — Principal Materials Supplier
- Phil Evans — Principal Builder, start to finish
- Colin Ledgar — Electrical Works
- Ben Ledgar — Joiner for Garage Build
- Gary & Dave Evans — Plumbing and Tiling
- Steve Rimmer, Homestyle Property Improvements — Glazing
- Dave Marland — Steelwork and Cladding
- Levi — Plastering
- Jake Bourne-Withey — Groundworks, Drainage and Landscaping
- Tile Mountain — Floor and Bathroom Tiling Supply
- Family and friends — Site Clearance, Painting, Insulation and Plasterboarding Support
BuildaPath is the digital project manager for your build.
BuildaPath helps homeowners manage self-builds, extensions and conversions with stages, tasks, budgets, funding, risks and reports in one place.
Start your 30-day free trial at www.buildapath.co.uk, no card required.